Version 0.95
Project initiator and main developer of Hatari: Thomas Huth
Manual written by: Matthias Arndt
Hatari on the WWW: http://hatari.sourceforge.net/
Hatari is an Atari ST emulator for Linux, FreeBSD, BeOS and other Systems which are supported by the SDL library. The emulator is open source software and is distributed under the terms of the GNU General Public License (GPL).
The Atari ST was a 16/32 bit computer system which was first released by Atari in 1985. Using the Motorola 68000 CPU, it was a very popular computer having quite a lot of CPU power at that time. See Appendix B for details on emulation in general.
Unlike many other Atari ST emulators which try to give you a good environment for running GEM applications, Hatari tries to emulate the hardware of a ST as close as possible so that it is able to run most of the old ST games and demos. Of course you can run normal GEM applications with Hatari, too. Recent versions of Hatari even feature basic STE, TT and Falcon emulation.
DSP is not emulated, but there's a dummy mode with which some additional demos work.
Hatari currently has the following system requirements:
Certain versions of Hatari have successfully been tested by various people on the following systems:
First, you need the SDL library, you can get it at: http://www.libsdl.org/. Most distributions already ship a suitable version. Make sure to install the appropriate header files as well often called "libsdl-dev" or the like.
Second, you need the zLib compression library. You can get it from http://www.gzip.org/zlib/ but the version shipped with your distribution will be sufficient in most cases. Make sure to have the header files for it installed as well.
Of course, you need the GNU C compiler and (GNU) Make, too!
Change to the hatari/ directory and adapt the configuration file Makefile.cnf to suite your system. Alternatively, you can use the supplied configure script to auto-detect all parameters (type " ./configure --help" to see the options of the script). Don't forget to use some good CFLAGS for the compiler optimizations, e.g. run configure in the following way:
CFLAGS="-O3 -fomit-frame-pointer" ./configure
Then compile Hatari by typing make. If all works fine, you'll get the executable hatari in the src/ subdirectory.
Before you can start Hatari, you have to copy a TOS ROM image to the data directory (the data directory is specified in the configuration file Makefile.cnf) and rename it to tos.img, or use the --tos command line option to tell Hatari where to find a TOS ROM. Hatari needs a TOS ROM image because this contains the operating system of the emulated Atari.
Unfortunately it is not possible to ship an original ROM image with the Hatari package since these images are still copyrighted. But you can easily create an image with a real ST and one of those various ROM-image programs for the ST (search for "TOSDUMP" with your favourite internet search engine). If your old ST does not work anymore, you can also try to search the internet directly for corresponding TOS ROM image, but don't ask the Hatari team where to get one.
Another solution is EmuTOS, which is also shipped with the official release versions of Hatari. EmuTOS is an open-source TOS clone. You can find it at: http://emutos.sourceforge.net/. It is not the best solution for playing games or running other old software due to compatibility issues, but it's free and compatible with Hatari.
If you do not specify a TOS image on the commandline nor can Hatari find a suitable TOS image in the default dir, you'll get the chance to select a TOS image file from the GUI.
Type make install as root to do a systemwide installation. In this case it is recommended to set the DATADIR variable in Makefile.cnf to a proper value. /usr/local/share/hatari is a good value in that case.
The Hatari executable should now be in your PATH and accessible from anywhere.
When you finally have got a TOS image, try starting Hatari with the option --help to find out more about its command line parameters.
Now type hatari to run the emulator for the first time. If all goes well, you should now be presented with a window showing you the familiar little green desktop of the Atari ST. Press F12 to turn on the GUI to configure Hatari to suit your needs, press F11 to toggle windowed and fullscreen mode.
Usage:
hatari [options] [disk image name]
The command line options are following (the long version is in parenthesis):
| Option | Purpose |
| -h (--help) | prints command line options and terminates |
| -v (--version) | prints version information and terminates |
| -m (--mono) | starts the emulated Atari ST in monochrome resolution (deprecated) |
| --monitor <x> | select monitor type (x = mono/rgb/vga/tv) |
| -f (--fullscreen) | tries to use a fullscreen mode |
| --window | forces Hatari to use a windowed mode |
| -z <x> (--zoom <x>) |
doubles ST low resolution (1=no, 2=yes) |
| --frameskip | drops every second frame (deprecated) |
| --frameskips <x> | Shows only every <x> frame (speeds up emulation!) |
| --force8bpp | force use of 8-bit window |
| --borders | show screen borders (for overscan demos etc) |
| -j <port> (--joystick <port>) |
activates joystick emulation via cursor keys
for given joystick "port" (0-5, see joystick dialog) |
| --nosound | disables sound (makes emulation faster) |
| -D (--debug) | activates the simple builtin debugger |
| --log <file> | direct log output to the specified file |
| --slowfdc | slows down FDC emulation (deprecated) |
| -d <dir> (--harddrive <dir>) |
emulates <dir> as a hard disk |
| --hdimage <imagefile> | emulate hard disk with an image file |
| --cartridge <imagefile> |
sets imagefile as the cartridge on the ROM port This currently does not work together with GEMDOS hard disk emulation! |
| --tos <imagefile> | specify TOS ROM image to use |
| -s <x> (--memsize <x>) |
set amount of emulated RAM upto 14MB x=0 for 512K, x=1,x=2 or x=4 for 1, 2 or 4 MB |
| --cpulevel <x> | specify CPU (680x0) to use (works on TOS 2.06 only!!) |
| --compatible | use a more compatible but slower 68000 CPU mode |
| --blitter | enable blitter emulation (ST only) |
| --dsp <x> | select DSP type (Falcon only, x = none/dymmy(/emu)) |
| --vdi | use extended VDI resolution |
| --printer <file> | enable experimental printer support to the specified file |
| --midi <file> | enable experimental MIDI output to the specified file |
| --rs232 <file> | enable experimental RS232 communication via the specified file |
| -c <file> (--configfile <file>) |
Use the given file as configuration file instead of ~/.hatari.cfg |
| -k <file> (--keymap <file>) |
Sets keyboard mapping to "From file" and uses the given file as keyboard mapping file |
| --machine <x> | Select machine type (x = st/ste/tt/falcon) |
Type hatari --help to list all the command line options supported by a given version of Hatari.
Once you've started Hatari succesfully, you can use the emulator as an allmost complete Atari ST computer system.
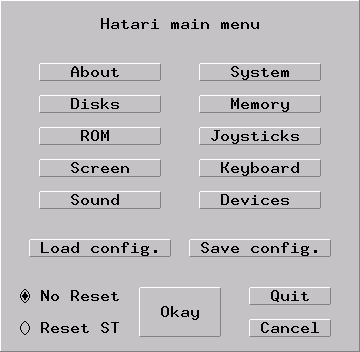
Press F12 to enter the GUI. Navigate it with the mouse. The GUI is rather self explanatory.
From the main menu, you can reach the other setup dialogs by clicking on the appropriate buttons.
You can load the current settings from a configuration file by clicking on the button and you can save the current settings to a configuration file with the button.
Click to go back to the emulated ST. All changed options will be applied.
Check the option if you want the emulated ST to perform a cold reset. This is equal to switching the power off and on again on a real ST.
Click to terminate Hatari and return to the host OS.
Click to abandon any changes that you have made.
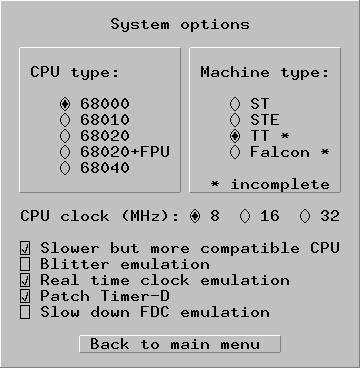
First you can select the CPU type here. Here are some important hints for choosing the correct CPU type:
Beside the CPU type, you can also choose the machine type to emulate.
The ST was the very first 16/32-bit computer from Atari. Most old games
and demos require an ST. The STE was introduced some years later and had
some advanced hardware features. There are not that much demos and games that
really require an STE but since most normal ST games/demos also work with the
STE, it's normally save to always work in STE mode.
TT and Falcon are more advanced, but they are not as compatible to the ST as
the STE was. So many old games and demos do not work with these machine types
anymore. There were only very few programs that were made for the TT
exclusively, while there were some interesting games and demos specially made
for the Falcon.
Note: TT and Falcon emulation are very incomplete. They may not work
very well.
For STE emulation a STE compatible TOS image, e.q. version 1.06, 1.62 or 2.x, is strongly recommended. For TT emulation you need TOS 3.0x and for Falcon emulation you need TOS 4.0x. EmuTOS can be used on all machine types.
Select the CPU clock you want to use. 8Mhz is ST standard and the most compatible. Use 16MHz for Mega STE and Falcon emulation. The CPU in the TT was clocked with 32 MHz.
With the "Slower but more compatible CPU" option, you can enable the emulation of 68k address errors and the CPU prefetch buffer. This is needed for best compatibility, but it slows down emulation a little bit so you can disable it if you don't need it.
You can also enable/disable Blitter emulation here. The Blitter is a custom chip that accelerates some graphical operations. This switch only toggles the Blitter in plain ST mode. In STE mode, the Blitter is always enabled (since all STEs have been sold with a Blitter chip).
If you enable the "Real time clock emulation" switch, a RTC will be emulated based on the time of the host computer. Note that you need at least TOS 1.02 for proper RTC emulation, TOS 1.00 does not support this.
The Timer-D patch changes the Timer-D initialization from TOS. TOS uses the MFP timer D as a baudrate generator for RS232. However, the TOS default value slows down the emulation. The patch gives you a better performance. It is normally save to enable the patch, but if you encounter a program that does not work, you can try to disable the patch to see if it works then.
Select if you want to use slow FDC emulation. Slow is more compatible esp. with games and demos that use custom loaders.
NOTE: These parameters are very sensitive to the emulated ST and it is strongly recommended to reset the emulated ST after changing these options.
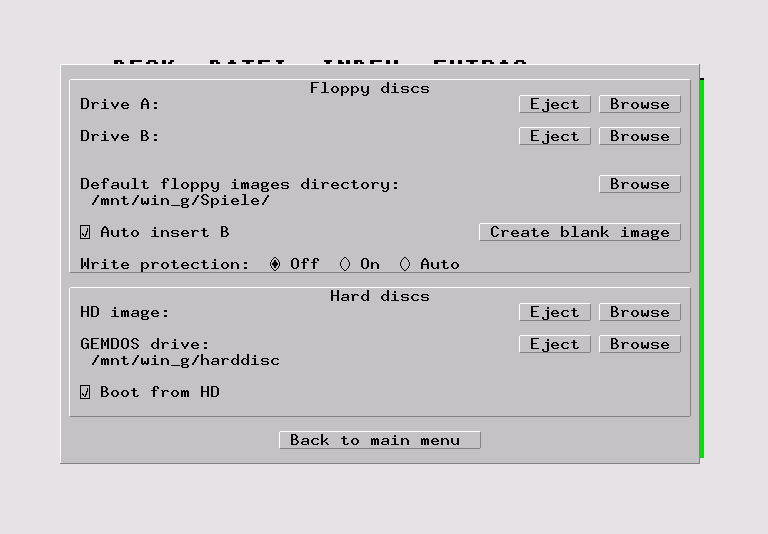
Use the upper dialog to choose which floppy disks should be emulated in the disk drives.
You can use most standard Atari ST disk image files. See the chapter "Floppy disk images" for details.
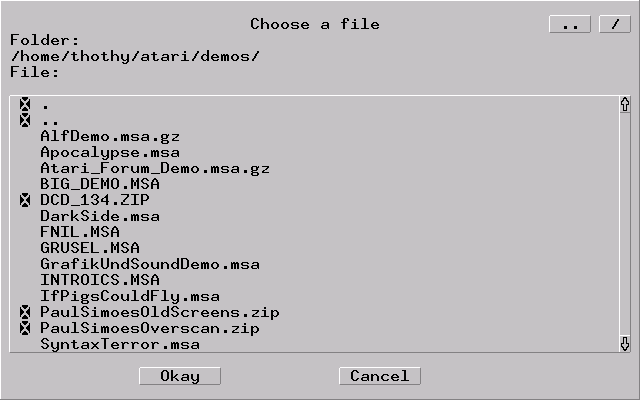
Click on the button next to the A: and B: option to go to the fileselector. You may select and browse zipped disk images as well.
The fileselector looks like this:
Click on to eject a disk image from the emulated drive. The emulated ST will act as if had no floppy disk in its drive.
You can specify a default directory where Hatari will start to browse the filesystem.
Check the "Auto insert B" option if you want Hatari to be smart and
insert the second disk of a two disk game automatically.
Some games then use the second drive automatically.
In the case that a game is not able to find the disk in the second drive,
you have to insert the second disk in drive A: manually when prompted.
NOTE: This option only works properly if the file name of the
first disks ends with an 'a' before the extension and the second disk name
ends with a 'b'.
If you need to create a new blank disk image, click on . Parameters for the new image can be set in the following dialog. Click on create to create the image or on to get back to the disk dialog.
After clicking , a fileselector appears. You can browse the filesystem now. Select the target directory, click beside File: and type in a name for the new disk image. The name should terminate with .st or .msa.
Hatari can currently create plain .ST and .MSA disk images exclusively.
You can choose if you want Hatari to writeprotect your disks. Atari ST virii can spread on disk images too so it is ok to enable the write protection option. However you can't save highscores or games to your disk images then.
Use the lower dialog to change the harddisk settings.
You can select a harddrive image for harddrive emulation via image file here or you may select a directory of your local filesystem to be emulated as the ST's harddrive.
Check "Boot from HD" if you want Hatari to execute the AUTO folder on the harddrive. This option is checked by default if you specify a harddrive image or a directory via the command line.
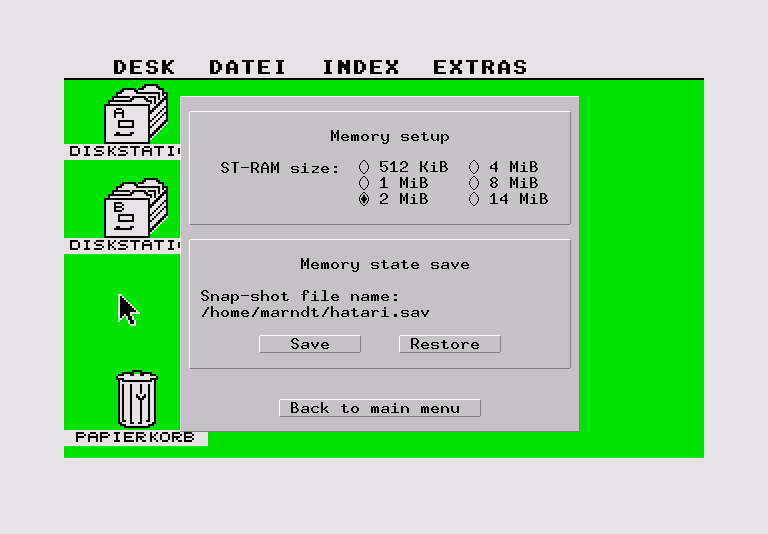
You can select the amount of RAM for the emulated ST here. Only amounts that were valid on a real unmodified STFM can be selected.
Note: This option is critical and you are strongly advised to reset the emulated ST when changing this option.
Here you will find the options to save memory snapshots as well.
Click on to save a memory snapshot to file. You can select a new filename here.
Click on to restore a memory snapshot from a file. Use the fileselector to select the snapshot to be restored.
NOTE: Memory snapshots are not interchangeable between different versions of Hatari. E.q. if you compile a newer Hatari, you cannot load your old memory snapshots back.

Here you can select the TOS image to use. Click on to select it via the fileselector. You can also select an optional cartridge image to use. Click on to select one via the fileselector. Click on to disconnect the custom cartridge image.
For ST mode, use TOS 1.00, 1.02, 1.04 or 2.06. For STE mode, use TOS 1.06, 1.62, 2.05 or 2.06. If you want to use the TT mode, you must specify a TOS 3.06 image here. And in Falcon mode, you have to use either TOS 4.00, 4.02, 4.04 or 4.92. However, you should always use TOS 4.04 for Falcon mode, it's the most common one. Also note that TOS 4.92 can not be booted from a boot disk (like it's done on a real Falcon), you have to specify it directly in the TOS ROM setup dialog here.
Keep in mind that any custom cartridge image will not work together with GEMDOS hard disk emulation or the VDI extended resolution emulation since some additional driver code will be used in the cartridge memory space for these emulations.
Note: These options are critical and you are strongly advised to reset the emulated ST when changing one of these option.
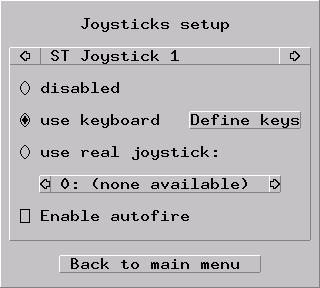
In this dialog, you can configure the emulated joysticks. With the upper two arrows, you can choose the joystick which you want to configure.
Joystick 1 is the normal ST joystick port and 99.9% of all ST games use this port. Joystick 0 emulates a joystick plugged into the ST mouse port and is often used in games for two players.
With STE joypad A and B, you can enable the emulation of Jaguar joypads which are plugged in the enhanced joystick ports of the Atari STE. Only very few STE games support these joypads, so you often won't need this.
Finally, Hatari also emulates joysticks which were plugged on the parallel port with a special adapter on a real ST. These were used in some few multi-player games like "Gauntlet 2".
For each ST joystick, choose whether you want to disable it, use the keyboard for emulation or use a real PC joystick.
For keyboard emulation, you can select the keys by pressing the button. You will be prompted to press the keys for up, down, left, right and fire.
If you want to use a real PC joystick for the emulation, you should connect it to your PC before you start Hatari. Then you can choose the joystick with the two lower arrows.
Check the "Enable autofire" option if you are too lazy to pound on the fire button in shoot'em-up games. However, this option only works with certain games. In some other games, it gets worse if you enable this option.
See also the chapter "Emulated Joystick" for details.
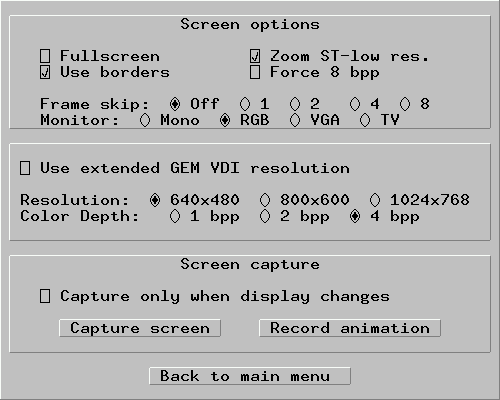
Here you control the video output of the emulated Atari.
Check "Fullscreen" to run Hatari fullscreen, default is windowed.
"Use Borders" toggles the displaying of the borders around the ST screen. Some few demos/games use the borders for displaying additional graphics. However, when you enable this option, it increases CPU computing time, so you should not enable it if you have a slow computer. Please note that this option also only affects the ST and STE mode, TT and Falcon modes are always displayed without borders.
"Zoom ST-Low res." controls wether Hatari doubles the low resolutions. For example Hatari then zooms the ST low resolution 320x200 to 640x400 and it doubles 384x267 (ST low with borders) to 768x534. Note that zooming also takes a lot of CPU computing time and should not be enabled on slow computers.
"Force 8Bpp" will force Hatari to use an 8bit video mode. You don't need this for modern video cards.
The "Frame Skip" option can be set to speed up the emulator if it is running too slow on your system. 1 to 8 frames will be dropped after each frame that has been drawn. Disable frame-skip if you have a fast computer.
You can select which sort of monitor to use. This option depends on the
machine type which you have selected in the "System options"
dialog. In ST and STE mode, you can choose between monochrome mode (select
"Mono") and color mode (select one of the other monitor types).
Note that when you select "TV" and use zoomed low resolution or
switch to ST medium resolution, you will get a TV-like screen rendering
which is a little bit faster but darker compared to the normal "RGB"
monitor mode. Switching between mono and a color monitor acts like a monitor
switch on a real ST - so beware, this will reboot your emulated system!
In TT mode, you can only choose between TT-high resolution ("Mono")
and normal modes (select one of the other monitor types).
Finally the Falcon mode supports all four types of monitors. Note that most
Falcon demos/games require a RGB or TV mode and do not work with VGA.
Extended GEM resolutions will emulate some sort of extended graphics
card in the emulated ST giving you larger resolutions and a higher
colordepth in GEM. Select a resolution and color depth. Check to
activate. It will disable all other video options mentioned above.
Uncheck to get back to a normal ST behaviour.
Note: Using an extended resolution will only work with GEM
conformant applications. 99% of all games and demos will not run if you
activate any extended resolution here.
Click to create a screenshot in .BMP format to the current working directory or click to record a sequence of single screenshots. You can opt to only record new movie frames when the screen content really changed.
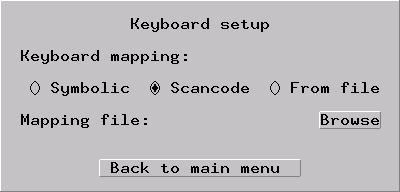
Here you can select the keyboard mapping to use. Two different mappings called "Symbolic" and "Scancode" are predefined.
"Symbolic" tries to map the symbolic values of your PC keys to the ST keys. It should be working pretty good on all systems as long as your keyboard layout looks close to the standard english keyboard layout. However, you might experience some problems with special keys like brackets etc.
"Scancode" uses the scancode values of your PC keys for keyboard mapping. This only works on certain architectures like Linux where the scancodes are similar to the ST scancodes (e.g. it does not work on Mac OS X). If it works on your system, this often gives better results than the symbolic mapping. Note that you also need a TOS version with the right language (e.g. use a French TOS if you are using a French keyboard).
You can also load a custom keyboard mapping file here if you wish. Please note that the custom keyboard mapping will use the "symbolic" mapping for all keys that are not defined by your map file. Have a look at the supplied example mapfile (keymap-sample.txt) to see how to create your own keyboard mapping.
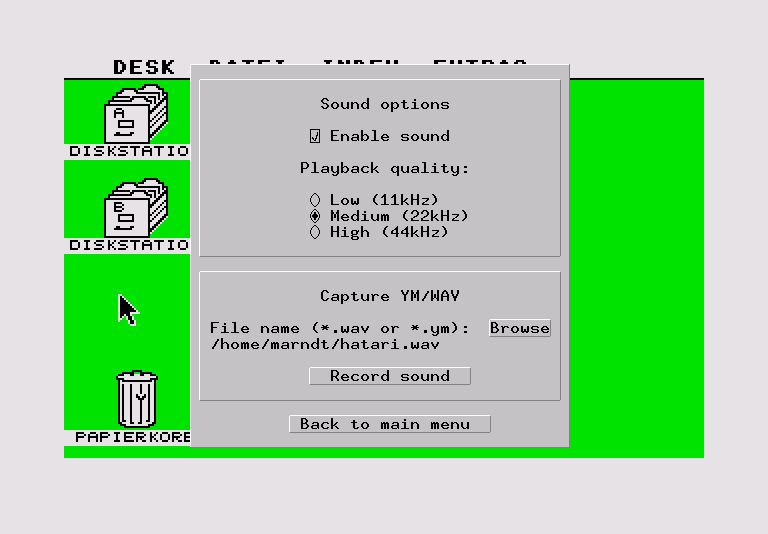
Here you can control the sound subsystem.
Check if you want emulated sound at all. Emulation is faster if sound emulation is turned off.
3 frequencies from low to high quality are available. Experiment a little bit to find out which fits best for your setup. Medium quality will work ok in most cases.
You can select to record a piece of sound here. Check which format to use and click the button. It is a toggle button so you will need to return to the GUI to switch sound recording off again.
Check here if you want to enable experimental printer support. See the chapter "Emulated printer" for details.
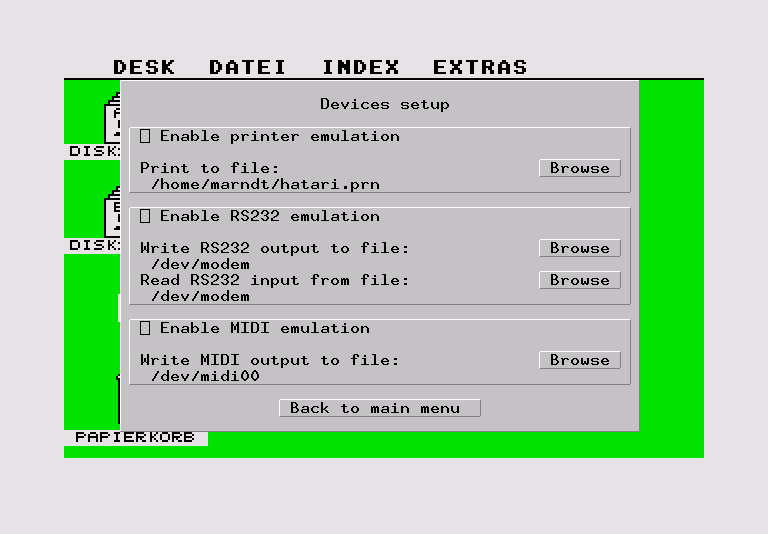
As Hatari currently only supports printing to file, click on to select the file to print to. You can enter a new filename as well.
NOTE: As the printer emulation is not perfect yet, activated printer support may interfere with the emulated sound. This is due to the fact that the Atari ST uses some general I/O ports of the soundchip for the printer port. The Hatari team suggests to disable printing while using games and demos.
Check the second checkmark if you want to enable experimental RS232 support. The RS232 device is configured according to the settings of the emulated RS232 of the Atari ST. This means Hatari will automatically use baudrate and handshaking as configured for the emulated ST.
Select a suitable device file for input and output. Click on to select. A good choice is /dev/ttyS0 or /dev/ttyS1.
You can enable MIDI as well. This currently works for outputting MIDI data only. A good choice is /dev/midi00.
Click on to select a suitable MIDI device file for output.
Your sound driver must support MIDI to make this work.
NOTE: RS232 and MIDI emulation are very experimental, too. Don't enable them unless you really need them!
While the emulator is running, you can activate or toggle various features via Hatari keyboard shortcuts. Below are listed the default shortcut key bindings:
| Shortcut | Purpose |
| ALTGR+a | record animation |
| ALTGR+g | grabs a screenshot |
| ALTGR+i | boss key: leave full screen mode and iconify window |
| ALTGR+j | toggles joystick emulation via cursor keys between port 0, port 1 and being off from those ports |
| ALTGR+m | (un-)locks the mouse into the window |
| ALTGR+r | (warm) reset the ST |
| ALTGR+c | coldreset the ST (same as the original power switch) |
| ALTGR+s | enable/disable sound |
| ALTGR+q | quit the emulator |
| ALTGR+x | toggle normal/max speed |
| ALTGR+y | enable/disable sound recording |
| ALTGR+k | save memory snapshot |
| ALTGR+l | load memory snapshot |
| ALTGR+f or F11 | toggles fullscreen and windowed mode |
| ALTGR+o or F12 | activate the GUI |
| PAUSE | will go to the debugger if Hatari was started with the -D option |
You can change the key bindings from the Hatari configuration file. The required key values you can see from the SDL_keysym.h include file (usually in /usr/include/SDL/).
All other keys on the keyboard act as the normal Atari ST keys so pressing SPACE on your PC will result in an emulated press of the SPACE key on the ST. The following keys have special meanings:
| Key | Meaning |
| Alt | will act as the ST's ALTERNATE key |
| left CTRL | will act as the ST's CONTROL key |
| Print Screen | will emulate the ST's HELP key |
| Scroll Lock | will emulate the ST's UNDO key |
| Page Up | will emulate the ST's ( key in the keypad |
| Page Down | will emulate the ST's ) in the keypad |
The right CTRL key is used by default as the fire button of the emulated joystick when you turn on joystick emulation via keyboard.
The cursor keys will be used by default as the emulated ST joystick, unless you are using joystick emulation via a real joystick or have disabled joystick emulation completely. Then the cursor keys will act as the cursor keys of the emulated Atari ST, of course.
For obvious reasons your PC mouse will act as the emulated Atari ST mouse. In fullscreen mode it will act as expected, directly controlling the ST mouse pointer.
However it is a little bit different in windowed mode. To make the mouse work there as expected you need to grab it first or lock it into the Hatari window. Do this by pressing the ALTGR+m hotkey combination. Press it again to go back to normal mouse behaviour which allows you to work in other X11 windows while Hatari is up and running.
Mouse scrollwheel will act as cursor up and down keys.
The Atari ST joysticks are emulated ofcourse allowing you to play your favourite games with Hatari.
The default mode is to use a connected PC joystick. You can use any joystick that is supported by your kernel. If your joystick works with other applications, it will likely work with Hatari as well. Make sure it is calibrated and then off you go. Move the stick to point into the desired direction. Please note that Hatari will not detect analogue movement as the Atari ST only had digital joysticks. The first firebutton will act as the normal firebutton on the Atari ST while the second firebutton will emulate a keypress of the SPACE key on the ST as many ST games utilitze the SPACE bar for secondary game functions. (Xenon for example)
If you do not have a PC joystick or joypad, then you do not need to desperate. You can emulate one of the two Atari ST joysticks via the cursor keys. Just activate it in the GUI. Then the cursor keys will act as the joystick directions, the right CTRL key will act as the firebutton. You can still use the cursor keys as the ST's cursorkeys in this mode as long as you press SHIFT along with the cursorkeys.
Hatari by default only handles ST modes, ST-LOW, ST-MED and ST-HIGH.
Overscan effects and socalled "Border Removal" are possible too.
Due to the fact that these effects are achieved by using quirks and glitches in the original chips to do things beyond their specification emulation is a bit tricky for these and not all ST applications utilizing these techniques will work properly in Hatari. Especially socalled "Sync Scrolling", a special technique to emulate the low byte of the video address, currently does not work properly in Hatari.
Beside that you can setup extended VDI modes. These only work with GEM-compliant applications and they are equal to fitting a videocard into your Mega ST.
Make sure to disable extended VDI modes for playing games as 99% of all ST games will not be able to make use of higher resolutions.
Due to the fact that printer handling is very different between Unix style machines and the Atari ST, emulation of the printer is achieved by writing all printer output to a file.
The file will contain a sequence of data, the same that would appear on the data pins of the Atari ST printer port. That would include control characters and commands for graphic printing. Clicking "Print desktop" on the GEM desktop would result in a messy data dump in the printer output.
Printer emulation works best for plain text files or programs that do not format the output for a specific printer. The file contents can be used with your favourite text editor for further processing and printing to a real printer.
To get real direct printing out of Hatari on a PostScript printer,
you may set up a GDOS printer with a PostScript driver on the emulated
Atari and set your printer device file as Hatari's printer output.
NOTE: This has not been tested yet and the Hatari team cannot
guarantee that it will work.
Serial communications in Hatari is designed to directly use a serial port on your PC.
Communications parameters are set automatically upon the settings of the emulated ST. This means all you do is to set the communication parameters like baudrate from your ST communications software. Hatari will do the rest and handle the serial input and output for you.
Hatari does not use floppy disks directly but disk images due to differences between the floppy disk controllers of the ST and the PC. Three types of disk images are currently supported: The raw "ST" type, the similar "DIM" type and the compressed "MSA" (Magic-Shadow-Archiver) type.
The raw type (file suffix should be "*.st") is simply a sector by sector image of a real floppy disk. You can easily create such an image with the dd program which should normally be pre-installed on every Unix-like system. Simply type something like dd if=/dev/fd0 of=myimage.st to create a disk image. Of course you need access to /dev/fd0, and depending on your system and the type of floppy disk you might have to use another device name here (for example I use /dev/fd0u720 for 720kB disks). However, if the disk is copy-protected or doesn't use a MSDOS compatible file system, this might fail. So be very careful if you're not sure about the disk format.
The other possibility is to image the disk on a real Atari ST. There are programs like the Magic Shadow Archiver for this task. Hatari supports this slightly compressed MSA disk images, too. Note that Hatari only supports the "old" MSA format, there are some Magic Shadow Archiver clones (like Jay-MSA) that create better compressed but Hatari-incompatible disk images. However, if you have got such a MSA disk and want to use it with Hatari, you can still run the corresponding MSA program within Hatari to extract the incompatible disk image to a normal floppy disk image.
While *.ST and *.MSA are more or less the "standard" types of Atari disk images, you might sometimes also find STT or ADF images on the internet. These currently do not work with Hatari.
Hatari can now also utilize *.DIM images just as *.ST ones without any problems. Note that DIM images are nearly the same as the raw ST images (they only have an additional 32 bytes header), so you can easily transform the DIM images into ST images by stripping the header from the files. For example try something like: dd if=input.dim of=output.st bs=32 skip=1
If you've got a disk image that has been created with the old ST emulator PaCifiST (for DOS) or with early versions of the program Makedisk, and the disk image does not work with Hatari, then the disk probably suffers from the "PaCifiST bootsector bug" (Hatari will display a warning message then). In this case, the bootsector of the disk contains some illegal data, so that the disk even does not work on a real ST any more. However, if it is a .ST and not a .MSA disk, you can easily fix it by using a hex-editor to change the byte at offset $D (13) from 0 to 1 (don't forget to backup your disk image first, since you can also easily destroy your disk image when changing a wrong byte there). If the disk contains a bootsector program, you probably have to adjust the boot sector check sum, too (it can be found at offset $1FE + $1FF).
Hatari supports disk images that are compressed with (Pk-)ZIP (file suffix must be ".zip") or GZip (file suffix must be ".st.gz" or ".msa.gz"), so you can archive your disk images into zip archives. You can also directly run the zip archives you may download from the net as long as the archive contains a disk image in .ST or .MSA format.
Note: Hatari does not save disk images back to *.ZIP files so your highscores and savegames are lost if you load the game from such a zipped disk image.
Hatari supports two ways of emulating a ST hard drive: The low-level ACSI hard disk emulation and a GEMDOS based drive emulation.
To use the ACSI hard disk emulation, you need a hard disk image file with a pre-installed HD driver in it. So either try to image your old ST hard disk or grab one from the internet (e.g. from the Hatari website). Please note that AHDI 5.0 is the only hard disk driver that is currently working and supported. Other hard disk drivers likely will not work.
To create a new ACSI hard disk image, you can start with an empty image that you have for example created with the following command: dd if=/dev/zero of=hd.img bs=512 count=xxx. Then copy the complete AHDI 5.0 package to a floppy disk image, and enable this floppy disk image and the fresh hard disk image in the emulator. Start HDX.PRG from the floppy disk and format and partition the hard disk with this tool. When you're finished, you have to restart the emulated system, run AHDI.PRG from the floppy disk and HINSTALL.PRG afterwards. With HINSTALL.PRG you can install the hard disk driver to the fresh HD image, so you can directly boot from the hard disk image in the future.
With the GEMDOS based drive emulation, you can easily "mount" a folder from the host file system to a drive of the emulated Atari. To use the GEMDOS based drive emulation, you should use a folder on your hard disk that only contains files and folders with valid TOS filenames. That means that all files/folders should be written in capital letters and their length mustn't exceed the 8+3 file name length limit. If you don't want to rename all files to get capital letters, it is also possible to store that folder on a FAT filesystem since those filesystems are case-insensitive.
GEMDOS drive emulation is an easy way to share files between the host system and the emulated Atari, but it is known to be incomplete and a little bit unstable, especially if you use it together with the ACSI hard disk emulation. So if your programs complain that they could not find/read/write files on the GEMDOS HD drive, you should try to copy them to a floppy disk image or a real hard disk image!
Due to the way the GEMDOS drive emulation is implemented at the moment, it is not possible to use a cartridge image together with GEMDOS drive emulation.
Note that changing the HD-image or the GEMDOS HD-folder will reset the emulated Atari since it is not possible to switch the hard disk while the emulator is running.
That's all for the moment. May the fun without the price to be with you ;-) !
This program is free software; you can redistribute it and/or modify it under the terms of the GNU General Public License as published by the Free Software Foundation; either version 2 of the License, or (at your option) any later version.
This program is distributed in the hope that it will be useful, but WITHOUT ANY WARRANTY; without even the implied warranty of MERCHANTABILITY or FITNESS FOR A PARTICULAR PURPOSE. See the GNU General Public License for more details.
You should have received a copy of the GNU General Public License along with this program; if not, write to the Free Software Foundation, Inc., 51 Franklin Street, Fifth Floor, Boston, MA 02110-1301, USA
The GNU Project and the Free Software Foundation | The GNU General Public License
Emulation via software is an art and Hatari is an example of this.
Emulation is to make a computer behave like a (probably) completely different machine on the lowest possible niveau. This includes CPU and custom chip emulation allowing software written for the emulated machine to be run without notice. A good emulator will run most of the software intended for the emulated platform without trouble.
The key to emulation is to simply do those things with a software program, the emulator, that normally chips would perform. So you have an CPU emulator that basically consists of a large loop that does exactly what the real thing would do:
The typical von-Neumann CPU can be emulated very fast, stable and error-free using such a simple loop system.
But in most cases the CPU emulation is the simplest part. Correct emulation of the various custom chips and hardware parts of the emulated system is much trickier.
| Matthias Arndt November 30 2005 |