|
|
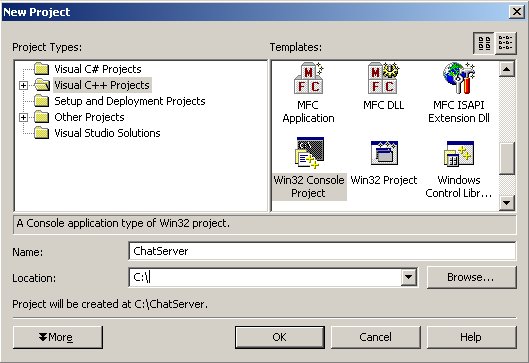
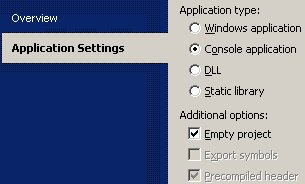
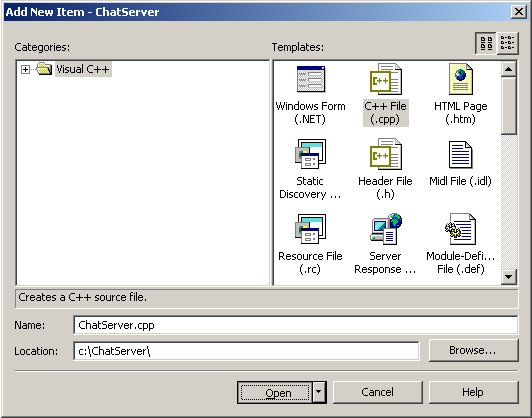
In this tutorial all images and interface references are for Visual Studio .Net, copyrighted by Microsoft. Use the equivalents for your own compiler.
|
|
|
| 1. Design Lets make the chat server as basic as possible to begin with. It will have two main modes: server and client. The server will relay client messages. The client will send chat messages. Both of them will display chat messages as they arrive. We'll hardcode most of the input variables so we don't clutter the code with non-networking stuff. This could be done by writing the chat data directly to a packet. However, we'll use RPC calls to avoid any chance of chat characters being mistaken for system messages. |
|
2. First compile
Create your main function. Query the user as to whether they want to run a client or server. Create the appropriate instance of the client or server. Destroy these at the end so we don't forget. This requires 3 of the files you copied earlier: RakNetworkFactory which creates instances of the client, server, and peer. RakServerInterface, which encompasses everything you might want to do with a server. RakClientInterface, which encompasses everything you might want to do with a client. Try writing it on your own first. When you are done, Display code sample 1 Hit F7 or the equivalent to build. It should build successfully at this point. If it doesn't, refer to the FAQ which gives many reasons for why something won't build and how to fix it. If that doesn't answer your question, post a question in the forum. |
|
3. Adding functionality
Now that we have a client and server instantiated, we need to know what it can do. The best way to find out is to go to the source: RakServerInterface.h and RakClientInterface.h. They contain all the functions for the class, plus detailed comments on each function. You can also refer to RakPeerInterface.h for future reference. At the top of RakServerInterface.h you'll find the Start function. At the top of RakClientInterface.h you'll find the Connect function. In the code, after the server was created, add code to start the server. That takes certain parameters - set whatever you wish, based on the description provided in the comments. Do something similar with the client. After the code where it is created, add code to connect it. It takes an IP - add code to read an IP. For the server port, either put code to read the port, or hardcode the server port you entered above. For the client port, either put code to read it, or put 0 to automatically choose. This is all you need to do to start a server or connect a client. To determine if the connection was successful, we need to be able to read messages from the network system. In both RakServerInterface.h and RakClientInterface.h you'll find a Receive function. This function returns a "Packet" structure, which is defined in NetworkTypes.h. It encapsulates one message and is quite simple. Go look at that now. As you can see from the "char *data" member, all packets contain an array of bytes. These bytes can be anything you want. The length of the array is indicated by the length and bitSize fields. The convention RakNet uses is the first byte is always an identifier that tells you what the rest of the data is. These identifiers are defined in PacketEnumerations.h. Go look at that now. You'll see there are quite a few pre-defined enumerations. You should quickly read the comments on each of them. If you wish, you can also take a look in the RakNet download under /Source/Multiplayer.h. It is a templated class that maps each of these to a function call. We only care about the connectivity enumerations for now. So your next programming step is as follows:
Display code sample 2 At this point you should be able to run two instances (In Visual Studio, hit ctrl-F5 twice) and connect to each other. If you cannot connect, then refer to the FAQ or post in the forum. This is the output from my version of the sample: Server output (C)lient or (S)erver? s Starting the server. A connection is incoming. Message with identifier 18 has arrived. Client output (C)lient or (S)erver? c Enter server IP or hit enter for 127.0.0.1 127.0.0.1 Starting the client. Our connection request has been accepted. Message with identifier 18 has arrived. What is the message with identifier 18? Go to PacketEnumerations.h and count, starting at 0. It should be ID_RECEIVED_STATIC_DATA. RakNet has a feature where on connection all systems automatically get system specific information. This feature is covered by the functions GetStaticClientData, SetStaticClientData, GetStaticServerData, and SetStaticClientData. You can refer to those functions in RakServerInterface.h and RakClientInterface.h. It is covered in detail in the sample located at \Samples\Code Samples\ServerEnumeration and StaticClient Data. Since we never previously set this, it didn't actually do anything useful. Since this is already covered in another sample, we'll ignore it here. In your code, add a case for ID_RECEIVED_STATIC_DATA and either ignore it or print a message. We are now ready to send user input. As specified early on, we will use remote procedure calls for this. Read that page to learn how to implement them and what the parameters mean. You can also refer to the sample at \Samples\Code Samples\Remote Procedure Calls. Lets make an RPC function called "PrintMessage". All it does is print "Hello World". We'll deal with user input later. Your next programming steps are:
Display code sample 3 The client output should be similar to before. The server output should also print "Hello World" (C)lient or (S)erver? s Starting the server. Hello World A connection is incoming. Got static data. Notice that "Hello World" has been printed before "A connection is incoming" was printed. This is due to the randomness of thread and process timing and is the first indicator that remote systems do not always run in synch. Now we are ready to send a message from the client to the server, rather than just printing a hardcoded "Hello World". If you take a look at the definition of RPC in either RakClientInterface or RakServerInterface you'll see that there are two overloaded versions. One takes a pointer to a BitStream while another takes an array with a length. The BitStream is a utility class that, as the name indicates, allows you to write data to a stream. You should refer to your RakNet download directory /Source/BitStream.h to familiarize yourself with the BitStream class and functions. You can also refer to the sample at Samples\Code Samples\BitStream. To keep things simple for this tutorial, we'll skip bitstreams for now and use arrays. You may wish to glance at Sending Packets which has some relevance here. Your next programming steps are:
Display code sample 4 Did you remember to multiply the number of bytes by 8 to pass the number of bits? If so, congratulations, you are more careful than I am, who didn't read the documentation and wasted several minutes figuring out why only garbage appeared. As per our original design, we want the server to relay messages. When the server gets the string, it should send the string back to the client. You have enough information to do this already so give it a shot. (Hint) The PrintMessage function needs access to the server. (Hint) If it isn't apparent what the PlayerID sender field is for, refer to the section on PlayerIDs. When done, Display code sample 5 This should be the output. It's the same as before, except the client now also shows the message. Client Output: (C)lient or (S)erver? c Enter server IP or hit enter for 127.0.0.1 127.0.0.1 Starting the client. Our connection request has been accepted. Enter a string to show on the server: This was typed on the client. Got static data. This was typed on the client. Server Output: (C)lient or (S)erver? s Starting the server. A connection is incoming. Got static data. This was typed on the client. Almost done. In practice, we don't want the person typing to see their own messages. Also, we should provide a mechanism where you can type anytime, not just when you first connect. Try it out, then Display final code sample 6 You'll have to run three instances of the program: 1 server and 2 clients to see anything happen. While gets() is blocking no network messages will be parsed so you might have to hit enter to bypass it to see other messages. In a real application you would use a nonblocking input function. The included samples use kbhit() to detect keyboard input. Some additional things you can try out are:
|
|
|
|
Index BitStreams Creating Packets FAQ Network Messages NetworkObject.h PlayerID Receiving Packets Remote Procedure calls Sending Packets |