|
|
| flPhoto Copyright 2002-2006 by Michael Sweet |
|---|
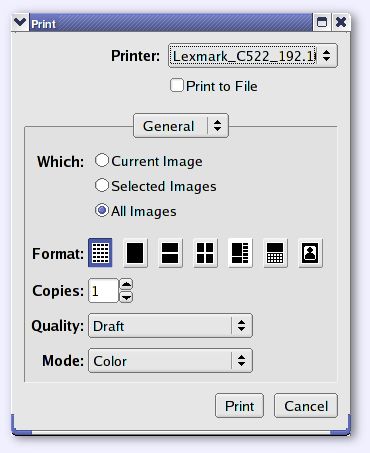
Choose Print... from the Album or Image menus to display the print dialog and print one or more images.
Click on the Printer chooser to pick the printer to use, and check the Print to File box to send the print to a file instead of the printer.
Click on Print to print the images, Cancel to cancel printing.

The General Options pane controls which images are printed, how they are formatted on the page, and how many copies are produced.
Click on Current Image, Selected Images, or All Images to choose which images to print.
Click on one of the format buttons to print an index, one image per page, two images per page, four images per page, a "portrait" collection of each image per page, a calendar with one image per month, or matted images.
Enter the number of copies you would like of each image. When printing index, one image per page, or portrait pages, the copies will be collated. When printing two or four images per page, the copies may begin in the middle of a page. For example, when printing four copies of three selected images (A, B, and C) in the four images per page format, three pages will be printed with the following images:
Click on the Quality chooser to pick the output quality to use. Draft quality will print low-resolution versions of the images. Normal quality adjusts the image resolution based on the size of the image on the page. Best quality always uses the full resolution of each image.
Click on the Mode chooser to pick whether to print in grayscale or color.

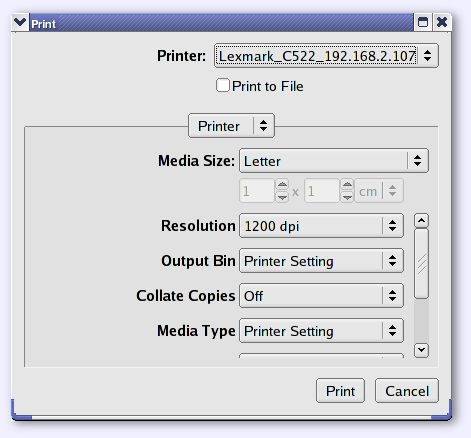
The Printer pane controls the printer and printer options that are used when printing the images.
Click on the Media Size chooser to pick the media to use.
Click on the appropriate chooser to pick other printer-specific options. The box below the Media Size fields can be scrolled when the printer driver supplies more than five extra options.

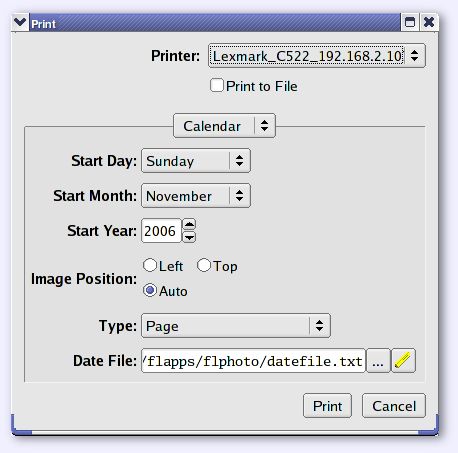
The Calendar pane controls the starting month and year and the image position for printed calendar(s).
Click on the Start Day chooser to select the first day of the week to print on the calendar. The chooser defaults to Sunday.
Click on the Start Month chooser to select the first month to print as a calendar. The chooser defaults to the current month.
Enter the initial year in the Start Year field. The field defaults to the current year.
Click on the Left, Top, or Auto buttons to set the position of the image with respect to the calendar. The default is Auto which will position landscape images above the calendar and portrait images to the left of the calendar.
Click on the Type chooser to select the type of calendar to print. The default Single Page calendar type places a single image and calendar on each page. Bound calendars are formatted to print a cover image and monthly calendars for the remaining images that may be bound together; spiral and comb binders are especially good for this. Folded calendars are formatted so that the pages can be stapled and folded in the middle of the pages. Both bound and folded calendars are meant to be printed on both sides of the page and offer even/odd page types for printers that don't support double-sided printing.

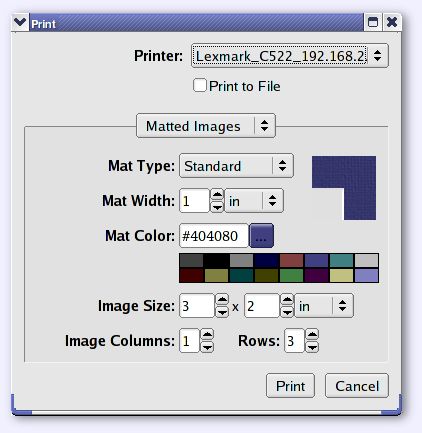
The Matted Images pane controls the appearance and size of matted images.
Click on the Mat Type chooser to select a style of matting; the following mat types are available:
Enter the desired width of the matting in the Mat Width field; click on the chooser to use different units.
Enter the desired matting color in the Mat Color field, click on the Choose... button to display the color chooser, or click on one of the color tiles to pick the corresponding color.
The color tiles represent the 16 most common colors in the image(s) to be printed.
Enter the desired width and height of the printed image(s). Images are scaled, rotated, and cropped as needed.
Enter the desired number of images to be displayed horizontally across the page.
Enter the desired number of images to be displayed vertically down the page.